|

Feeler Gauge - A very useful and very necessary tool for valve adjustments
|
|

Remove the valve caps
|
|

Do yourself a favor and place the side cover bolts on the ground in the
order you removed them. This keeps you from guessing what length goes
where.
|
|

If you're careful you don't need to replace the gasket after each valve
adjustment. We're still using the original gasket after many valve
checks/adjustments.
|
|

Crank counterclockwise
|
|

Line the "T" up with the notch
|
Some folks won't
make the transition from a 2-stroke to a 4-stroke motorcycle, due to the
perceived additional maintenance that a 4-stroke requires. Our 2001
Honda XR650R just had its First-Year Birthday and has approximately 3,000
miles logged. These aren't simple trail riding miles; in fact,
"Big Red" competed in the 2001 Baja 500 taking 4th place
in the Sportsman class. Besides being ridden hard and being put away
dirty more then a few times, Big Red has been raced in a few local
events. She has also been subject to trail rides with the likes of
Destry Abbott as well, so the level of abuse is only second to that of a full
on race bike.
What has she asked for in
return? Not much! A few sets of tires, her air filter cleaned
every other ride, oil changed every few rides and the valves adjusted every
six hundred miles or so. The following steps and values are specific to
the XR650R but most modern 4-stokes on the market today will do just fine
with the same level of maintenance we've described above. Even if you
get a 4-storke with a bucket-shim type valve adjustment, it's not that
difficult. Since the first three 4-stroke survival tips are self
explanatory we'll go through the XR650R valve adjustment step-by-step to show
those that haven't yet made the stroke leap, just how simple it is.
Well that, and for those that are too cheap to buy a service manual.
Remember-these steps
are only for XR650R valve adjustment.
- Remove the seat and gas tank.
- Remove the valve hole caps
- Remove the left crankcase
cover.
- Rotate the flywheel (Big nut
in the center of where you removed the crankcase cover) counterclockwise
two or three revolutions, lining the "T" up with the
"notch" on top of the housing that you removed the side cover
from. If the "T" goes past the notch, start over.
You don't want to activate the decompressor mechanism. Make sure
you are at top dead center (TDC) on the compression stroke. A
simple way to check this is by moving the "rocker arms" up and
down once you've aligned the "T". Slight up and down movement
= top dead center. Locked up tight with no movement= turning the
flywheel a few more turns, lining up the "T".
- Using a feeler gauge check
the tolerances on the 4 valves. Intake (closest to carburetor)
should be from 0.15 ±0.02 mm (0.006 ±0.001 in). Exhaust (Closest to
where the exhaust system comes out of the engine) should be 0.20 ±0.02
mm (0.008 ±0.001 in).
- If any of the valves are out
of adjustment the easiest way to adjust them is by using a box end
wrench and standard screwdriver. Loosen the lock nut while the
screwdriver is in the slot, turn the
screwdriver counterclockwise placing the feeler gauge in-between the
adjuster screw and rocker arm. Now, tighten or loosen the
adjusting screw with the screwdriver so the feeler gauge has a slight
drag while pulling it out and sliding it back in.
To put you right smack dab in the middle of the tolerances
use these values.
Intake Valves-XR650R
|
Exhaust Valves-XR650R
|
|
Use .152 mm or .006 in. These are both the same
size, just one is metric and the other is standard.
|
Use .203 mm or .008 in. Again, these are both the
same size just a metric and standard measurement.
|
|
|
|
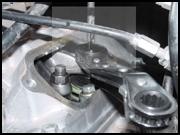
-
|

The tip of the feeler gauge is right where it needs to be but notice the
bolt head under it. This might cause an inaccurate reading. It's best to
angle the feeler gauge so it's even with the carburetor when checking the
intake clearance.
|
|
|
- Be sure to keep the
screwdriver steady with no turning while you re-tighten the lock
nut. Now check your work.
- On the intake valves a size
.178 mm/.007 in. feeler gauge might still tightly squeeze in, this is
ok, but a .203mm/.008in. should not fit. On the exhaust valves a
.229mm/.009 in. might fight its way in but a .2254mm/010in. should not
gain access.
- Re-assemble everything and
fire her up. With the valves properly adjusted she should sound
like a sewing machine.
Adjusting the exhaust
valves is somewhat tricky because of the limited room you have to work
with. Don't stress over this, after the first adjustment ours haven't
needed further tweaking. On the other hand, the intakes have, but they
are easy to get to and adjust.
The first time you adjust
the valves it will probably take you an hour. After you get the hang of
it, 20 minutes tops.
There you have it, the
feared valve adjustment and it's almost painless.
|


